Mervis CloudAccess
- A technology that replaces the use of VPN for remote data communication while minimizing latency.
- The connection is initiated from the PLC to the cloud - communication, therefore, does not require a public IP or port forwarding.
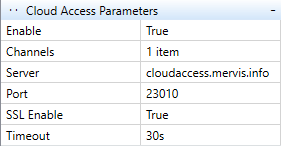
- An encrypted connection is established to
cloudaccess.mervis.info:23010/tcp
- A separate direct encrypted TCP connection is established for each client - internal communication can therefore use an unsecured protocol (e.g., Modbus TCP) without compromising security.
Mervis IDE
- CloudAccess communication settings are not available on all platforms.

Amit
- DetStudio version 3.2.12 and newer

- In the profile for MervisCloud, set the certificate slot. It should point to the slot where the `isrgrootx1.pem` certificate is uploaded. If the customer doesn't know which certificate slot contains the certificate, or if it hasn't been uploaded yet, it can be checked in the Transfer/Certificate Manager tab. Link to the certificate: https://letsencrypt.org/certs/isrgrootx1.pem
Teltonika
- You need to have the CloudAccess package installed (contact technical support to obtain the correct packages for your firmware version).
Supported Models for CloudAccess
- RUT9M family (RUT9M_R_… SDK): RUT901, RUT906, RUT951, RUT956
- TRB1 family (TRB1_R_… SDK): TRB140, TRB141, TRB142, TRB143, TRB145
Configure RUT906 for CloudAccess - Step by Step
- Initial Setup: Connect to the Teltonika web interface (http://192.168.1.1) and change the default admin password.
- Network Configuration: Configure your Cellular connection (Network > Mobile > General) or Wi-Fi connection (Network > Wireless > SSIDs).
- Firmware Upgrade: Navigate to System > Firmware and upgrade to the latest supported version.
- CloudAccess Client Installation:
- Option A (Recommended) - Web UI Package Manager:
- Navigate to System > Package Manager and select Upload package.
- Upload the Mervis CloudAccess package (`mervis-cloudaccess.tar.gz`) provided by support and click Install anyway.
- Upload the Mervis CloudAccess UI package (`mervis-cloudaccess-ui.tar.gz`) provided by support and click Install anyway.
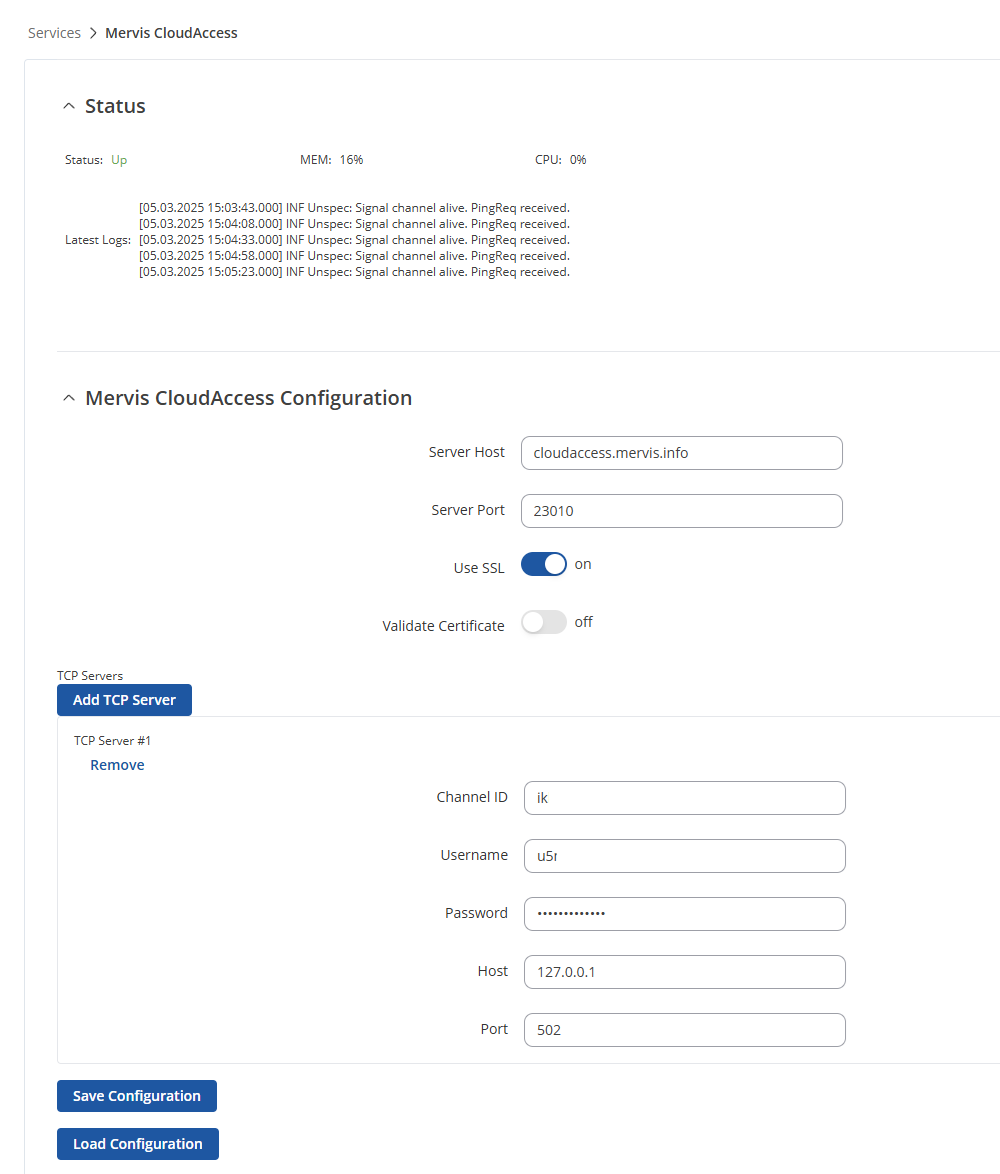
- Note: Now CloudAccess is installed and you can access the configuration page at Services > Mervis CloudAccess.
- If you click on Load Configuration for the first time after installation and see an error message saying “Failed to load configuration”, a reboot is needed.
- Option B - Command Line:
- Copy the installation file `RUT9M_cloudaccess_1.0.0-1_mipsel_24kc.ipk` to your Teltonika device:
scp .\RUT9M_cloudaccess_1.0.0-1_mipsel_24kc.ipk root@192.168.1.1:/tmp/
scp .\vuci-app-cloudaccess-api_1_mipsel_24kc.ipk root@192.168.1.1:/tmp/
scp .\vuci-app-cloudaccess-ui_1_mipsel_24kc.ipk root@192.168.1.1:/tmp/
- SSH into the router and install the packages:
ssh root@192.168.1.1
opkg update
opkg install libstdcpp
opkg install /tmp/RUT9M_cloudaccess_1.0.0-1_mipsel_24kc.ipk
opkg install /tmp/vuci-app-cloudaccess-api_1_mipsel_24kc.ipk
opkg install /tmp/vuci-app-cloudaccess-ui_1_mipsel_24kc.ipk
/etc/init.d/uhttpd restart
/etc/init.d/rpcd restart
- Setting up Modbus TCP over Serial Gateway:
- Navigate to Services > Modbus > Modbus TCP over Serial Gateway.
- Add a new instance (e.g., “Demo”) and select rs485 as the Device name.
- Configure the serial parameters: Baud rate 9600, Data bits 8, Stop bits 1, Parity None, Flow control None.
- Set Listening IP to 127.0.0.1 (to use the connection through Mervis CloudAccess) and Port to 502.
- Select User defined for the Server ID configuration type, and enter 1 as the Server ID.
- Click Save & Apply.
- Configure CloudAccess Client: Go to Services > Mervis CloudAccess to configure your server host, port, and TCP server channels.


Configure TRB145 for CloudAccess - Step by Step
- Initial Setup: TRB145 does not have an ethernet interface. Use a USB cable and connect through the virtual network (http://192.168.2.1). Change the default admin password.
- Firmware Upgrade: Navigate to System > Firmware and upgrade to the latest supported version.
- CloudAccess Client Installation:
- Option A - Web UI Package Manager:
- Navigate to System > Package Manager and select Upload package.
- Upload the TRB1 Mervis CloudAccess package (`TRB1_cloudaccess.tar.gz`) provided by support and click Install anyway.
- Upload the Mervis CloudAccess UI package (`mervis-cloudaccess-ui.tar.gz`) provided by support and click Install anyway.
- Note: Now CloudAccess is installed and you can access the configuration page at Services > Mervis CloudAccess.
- If you click on Load Configuration for the first time after installation and see an error message saying “Failed to load configuration”, a reboot is needed.
- Option B - Command Line:
- Copy the installation files using SSH:
ssh -oHostKeyAlgorithms=+ssh-rsa root@192.168.2.1
scp -oHostKeyAlgorithms=+ssh-rsa -O .\TRB1_cloudaccess_1.0.0-1_arm_cortex-a7_neon-vfpv4.ipk root@192.168.2.1:/tmp/
scp .\vuci-app-cloudaccess-api_1_arm_cortex-a7_neon-vfpv4.ipk root@192.168.2.1:/tmp/
scp .\vuci-app-cloudaccess-ui_1_arm_cortex-a7_neon-vfpv4.ipk root@192.168.2.1:/tmp/
- Install the packages:
ssh root@192.168.2.1
opkg update
opkg install libstdcpp
opkg install /tmp/TRB1_cloudaccess_1.0.0-1_arm_cortex-a7_neon-vfpv4.ipk
opkg install /tmp/vuci-app-cloudaccess-api_1_arm_cortex-a7_neon-vfpv4.ipk
opkg install /tmp/vuci-app-cloudaccess-ui_1_arm_cortex-a7_neon-vfpv4.ipk
/etc/init.d/uhttpd restart
/etc/init.d/rpcd restart
- Setting up Modbus TCP over Serial Gateway:
- Navigate to Services > RS485.
- Change “Serial type” to MODBUS gateway and enable the configuration.
- Configure the serial parameters: Baud rate 9600, Data bits 8, Stop bits 1, Parity None, Flow control None.
- Set Listening IP to 127.0.0.1 and Port to 502.
- Select User defined for the Server ID, enter 1, and turn Full Duplex off.
- Click Save & Apply.
- Configure CloudAccess Client: Go to Services > Mervis CloudAccess to configure your settings.
Teltonika RUT906 RS485 Wiring
For a 2-Wire Network setup connecting a serial device to the Teltonika RUT906, follow this wiring scheme:
- Wire the device's RxTx- to D_N on the RUT906.
- Wire the device's RxTx+ to D_P on the RUT906.
- Wire the device's GND to GND on the RUT906.
- On the RUT906 terminal block itself, bridge D_N with R_N, and bridge D_P with R_P.