Table of Contents
Projects
This section provides an overview of projects within a given domain and allows their management. In the main overview, projects can be searched, created, edited, deleted, and permissions for individual users and groups can be managed. There is also access to project file management, including the upload, editing, and deletion history.
1. Project Overview
At the top of the table, there is a Filter field for full-text project search. Below it, you can see a list of all projects in the domain with basic information:
| Column | Description |
|---|---|
| Name | Project name |
| Guid | Unique project identifier |
| Status | Project status |
| Required action | Action that must be performed for the project to reach the desired state |
| Datapoints | Number of project datapoints |
| Actions | Buttons to edit |
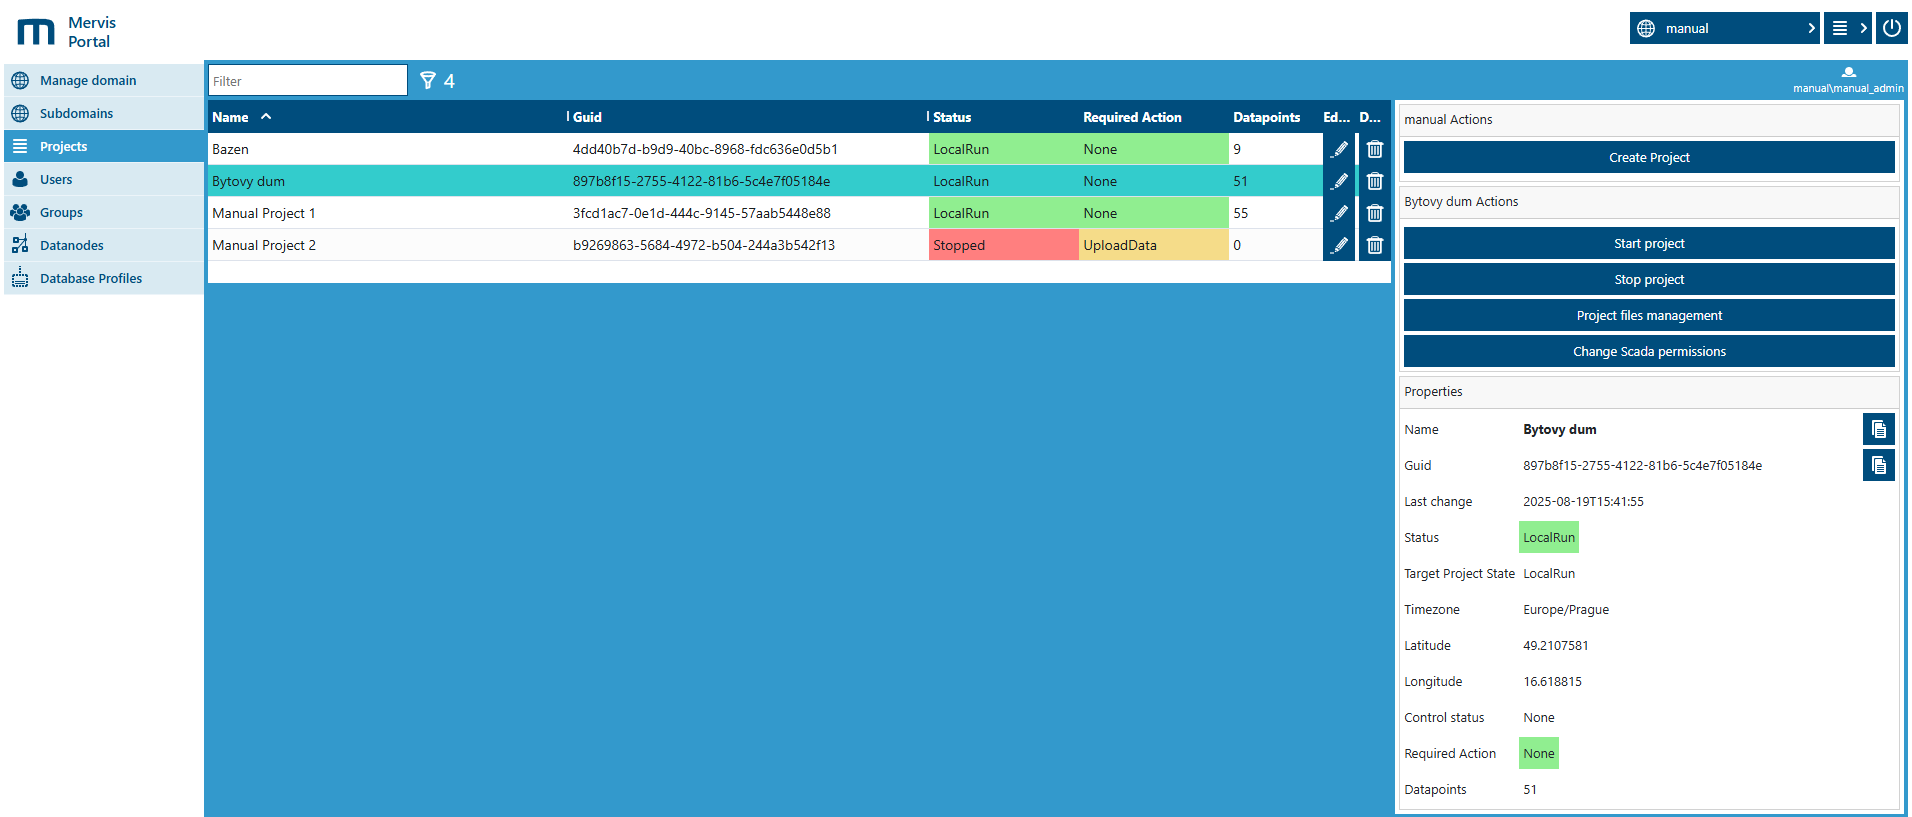
2. Project Detail
When selecting a specific project, a panel with detailed information is displayed on the right side of the screen:
Properties:
- Name – project name
- Guid – unique project identifier
- Last Change – date and time of the last project modification
- Status – current project status
- Target Project State – desired project state
- Timezone – project time zone
- Latitude / Longitude – coordinates of the project’s physical location
- Control Status – current project control status
- Required Action – action required to bring the project into the desired state
- Datapoints – number of project datapoints
Special attention should be paid to Control Status and Required Action, as they inform the user about ongoing or necessary changes in the project state.
The Control Status property can take the following values:
- None – status is not relevant information (project is not uploaded to SCADA)
- Waiting – project status is being checked
- Stopping – project is stopping
- Unloading – project is being unloaded
- Loading – project is being loaded
- ReloadingProperties – project properties are being reloaded
- ReloadingData – data files are being reloaded
- Starting – project is starting
- Failed – project control failed temporarily (another automatic attempt will be made)
- DoneFailed – automatic project control failed (process is not continued)
- Suspended – automatic project control has been suspended (awaiting manual intervention)
Most of these states do not require any user action – they are just intermediate steps during which the automatic control process continues. Exceptions are Suspended and DoneFailed.
If Control Status is set to Suspended, the user with the SCADA.Aggregated_Manage permission is advised to restore the project state. This can be done by clicking Apply Changes in Project Files Management. The project typically enters the Suspended state when project files are changed or when administrative tools modify the project.
If Control Status is set to DoneFailed, it means the system could not complete the process due to an error. A user with SCADA.Aggregated_Manage permission should check the Required Action and manually resolve the problem. This usually concerns data file errors (UploadData, FixDataFormat, FixDataConflicts) where the correct files must be uploaded and Apply Changes pressed again.
The Required Action property can take the following values:
- None – no action required, the project is in the desired state
- Load – load the project into SCADA
- ReloadProperties – reload project properties
- ReloadData – reload data files
- Start – start the project
- Stop – stop the project
- Unload – remove the project from the SCADA instance
- FixInstance – switch the project from the current instance to the target SCADA instance
- UploadData – upload missing data file
- FixDataFormat – fix invalid data file format
- FixDataConflicts – resolve conflicts between multiple data files
3. Action Panel
For each project, the following actions are available in the right-hand panel:
- Create Project – create a new project
- Start Project / Stop Project – start and stop the selected project, respectively.
- Project Files Management – opens a modal window where the user can upload, edit, download, and delete project files. It also provides access to the project files history.
- Change Scada permissions – manage SCADA permissions for the selected project
3.1 Create Project
Each project consists of properties and data files. Using the Portal, a new project can be created, meaning only its record with properties. The form for creating a new project opens after clicking Create Project in the action panel. In the dialog, the following items can be set:
| Field | Description |
|---|---|
| Name | Project name (mandatory field) |
| Guid | Unique project identifier |
| Target Project State | Desired project state |
| Timezone | Project time zone |
| Latitude / Longitude | Coordinates of the project’s physical location for map display in Mervis |
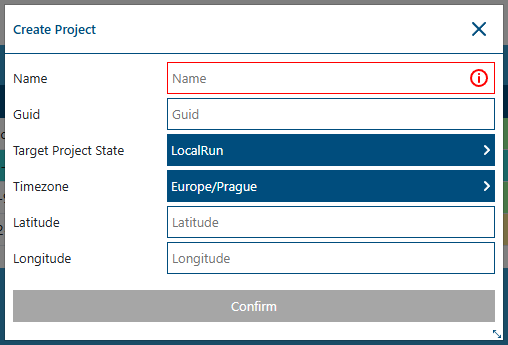
Project name is the only required field in the form, but it can be changed at any time. The Guid does not need to be entered manually; if left empty, it will be generated. However, the project’s Guid must match the Guid of uploaded .data files.
Currently, data files cannot be created within the Portal – they must be generated by an external application. Through the Portal, such files can then be uploaded, and the project can be started or existing files downloaded. See Project Files Management for more details.
Once the project record is created, it will be visible in the Mervis system to users with the appropriate permissions. After permission changes, it may take some time for updates to propagate (usually immediately or within half a minute). In the initial phase, without project files, no content will be visible. Changing project properties such as project name, time zone, or location will not affect its runtime; if the project is running, it will continue, and new properties will be applied on the fly. Changing the domain may cause the project to stop and restart, as it may be reassigned to a more suitable SCADA instance.
3.2 Start Project / Stop Project
The Start Project button sets the desired project state to LocalRun. Conversely, the Stop Project button changes the desired state to Stopped, which results in stopping the project.
3.3 Project Files Management
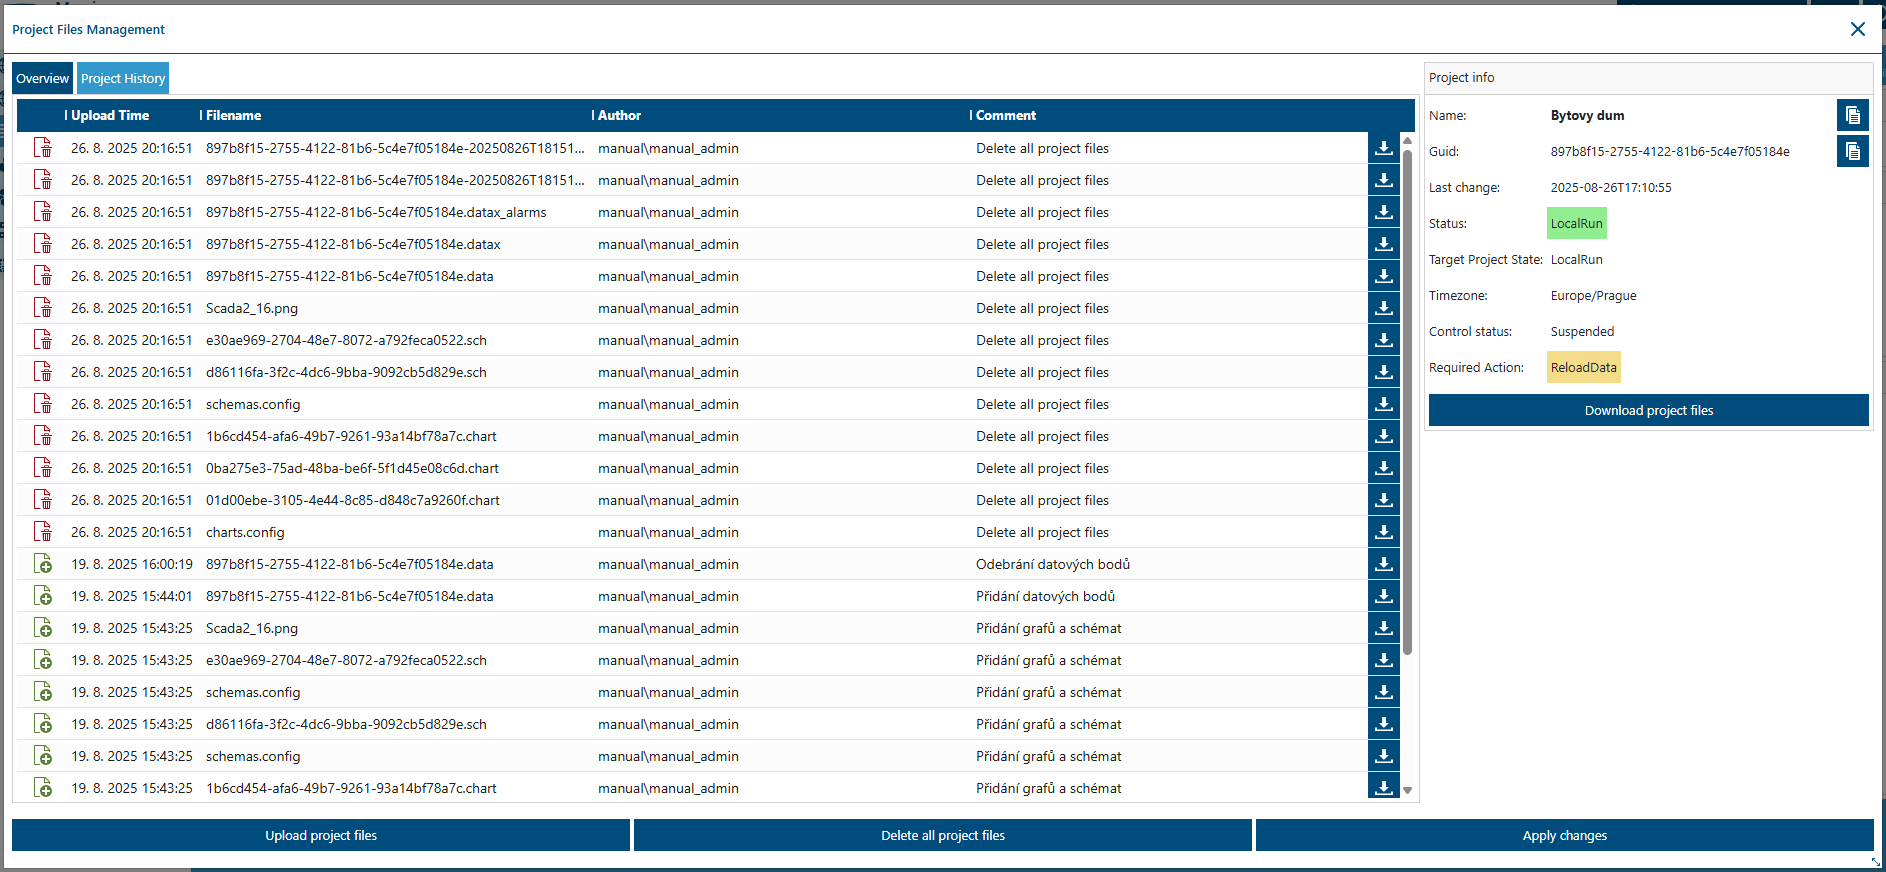
This section can be accessed by clicking the Project Files Management button. At the top of the modal window, there are two tabs – Overview and Project History. By default, the Overview tab is active, and the window is divided into the following parts:
- Project file list – a table with project files and folders (charts, schemas, data files)
- Project information panel (on the right) – shows name, Guid, status, target state, etc.
- File history – overview of uploads and changes of the selected file
- Control buttons (see table)
| Name | Function |
|---|---|
| Add project files | Allows adding new project files. |
| Add project folders | Allows adding new project folders. |
| Clear unsaved changes | Clears files prepared for upload. This does not delete project files already in Mervis! |
| Download project files | Downloads current project files. Recommended before every update as a backup. |
| Upload project files | Uploads project files to the server. |
| Delete all project files | Deletes all project files from server! |
| Apply changes | Executes all required operations to deploy the project into Mervis. |
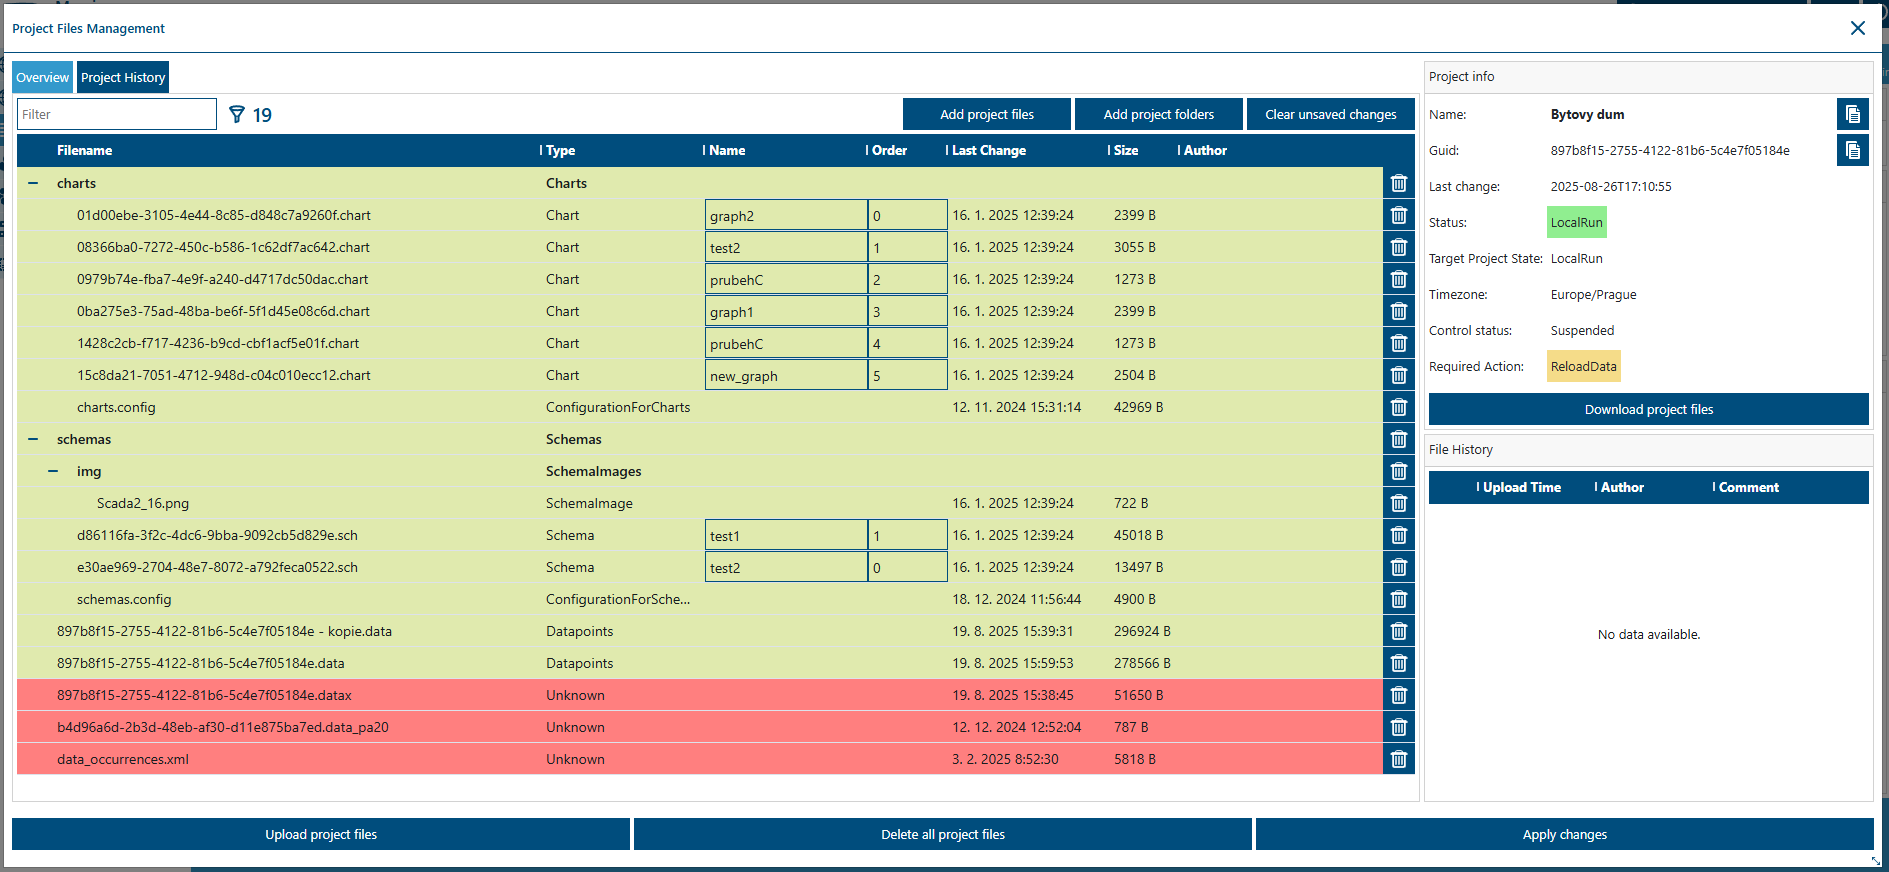
3.3.1 Project File Overview
At the top of the table, there is a filter for full-text file search. Below it, a list of all project files is displayed with basic details:
| Column | Description |
|---|---|
| Filename | File name |
| Type | File type (Chart, Schema, Datapoints, …) |
| Name | User-defined name (editable) |
| Order | Display order (editable) |
| Last Change | Date and time of the last modification |
| Size | File size |
| Author | User who made the change |
| Actions | Buttons for download |
3.3.2 Uploading Project Files
Procedure:
1. Prepare the files you want to upload.
2. Select files using Add project files / Add project folders, or drag & drop them directly into the window.
3. Newly added files are highlighted. Unsupported formats are marked red and will not be uploaded to Mervis.
4. For schemas, you can fill in Name and set Order for display.
5. Click Upload project files to upload files to Mervis.
6. Click Apply changes to execute all necessary operations and deploy the project.
Note: * After uploading data files (*.data, *.data_p*) and applying changes, the project will stop and then restart with the new files.
- Uploading other files and applying changes will take effect without stopping the project.
- Deleting a project triggers its termination and removal from the system.
3.3.3 Project File History
The Project History tab provides an overview of all changes made to project files, serving as an electronic audit trail. The user can see the complete history of uploaded files, the identity of the user who made the change (Author), the exact date and time of modification, and any comments included with the modifications. This satisfies strict compliance and QA requirements by maintaining a reliable, viewable log of system configuration changes.
| Column | Description |
|---|---|
| Operation Type | Type of operation performed on the file |
| Upload Time | Date and time of file modification |
| Filename | File name |
| Author | User who made the change |
| Comment | Comment on the change |
| Actions | Download button |
File operations:
 CreateOrUpdate – create or update file
 Delete – delete file
 CleanUp – clean file history
 Rename – rename file
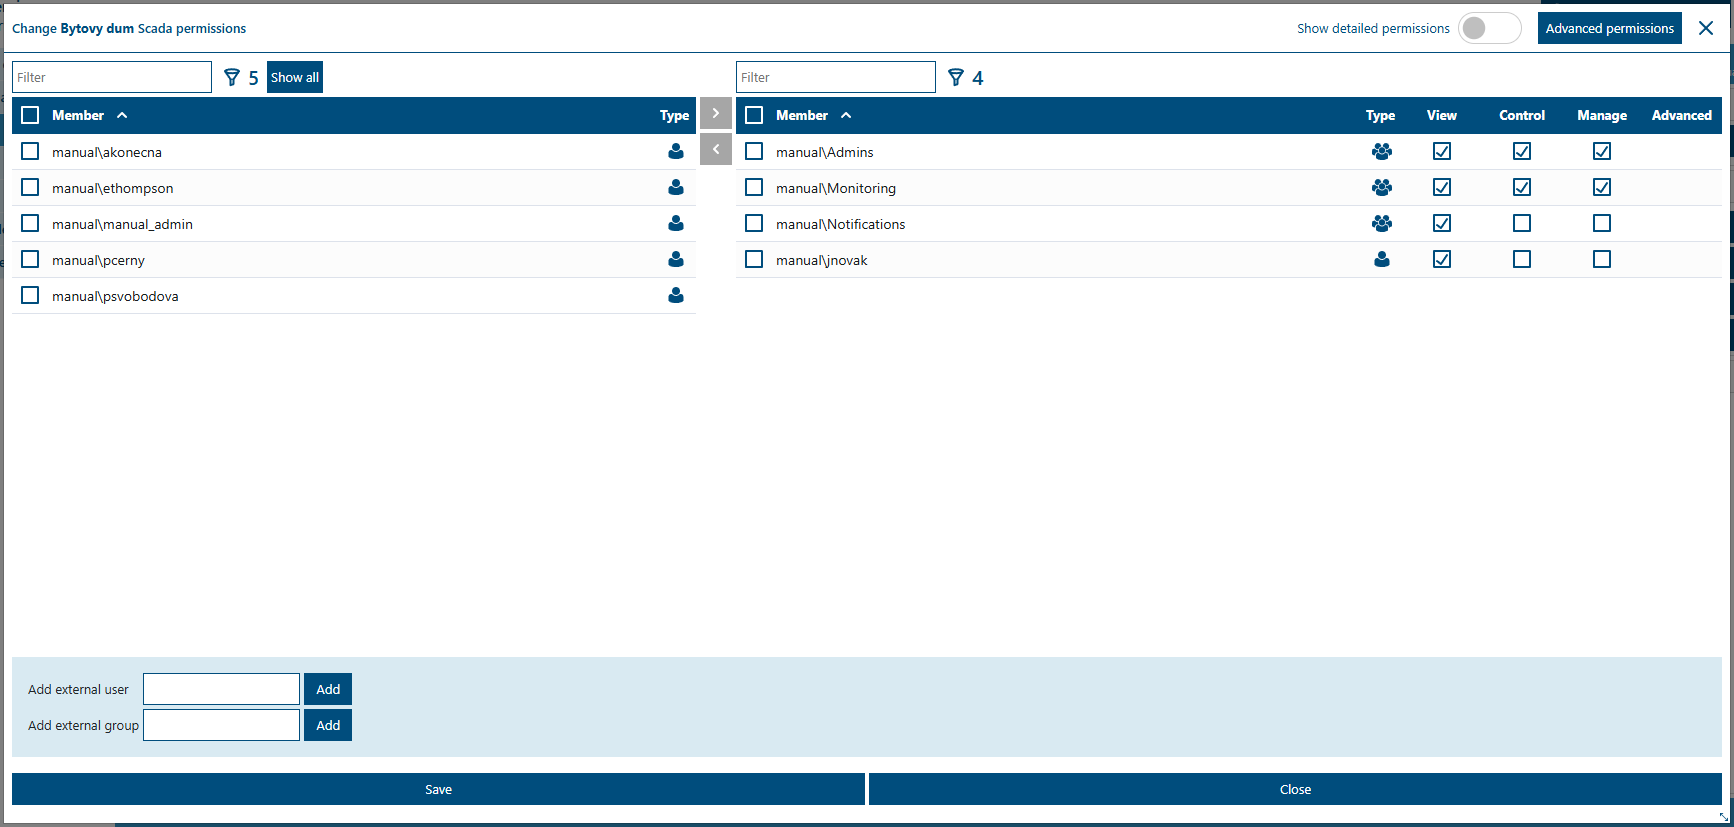
3.4 Change Scada Permissions
This button opens a modal window for setting SCADA permissions on the selected project. By combining the permissions below and assigning them to User Groups, you can replicate common operational roles (e.g., Viewer, Operator, QA, Admin).
Permission types:
- View – allows viewing the project.
- Control – in addition to viewing, enables control actions. Buttons become active. Scheduling is available.
- Manage – allows uploading and restarting projects.
Permissions must be combined. For control, both View and Control permissions are required. See Permissions for more details.